This is just a quick note on a problem I've just experienced (and found a fix for!).
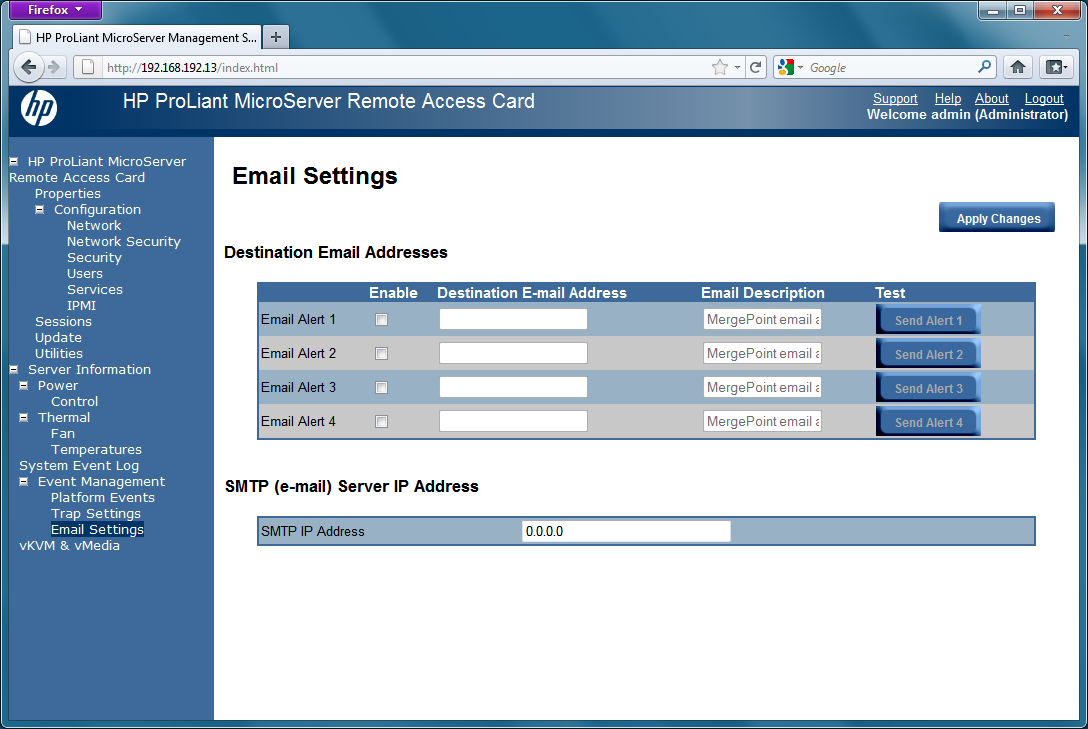
Having just built a new Windows 2008 VM and mounting the ISO from my NFS ISO datastore, I was surprised to see that the actual install was crawling along very slowly at the "Expanding Windows files" section:
As the above link indicates, the problem was the ESX hosts NIC configuration. Set to "auto-negotiate" (which it should be on gigabit connections), the port had managed to negotiate down to 10Mb half-duplex(!). I changed this to 1000Mbit full-duplex and then back to auto-negotiate (where it stayed at 1000Mbit full-duplex).
And the performance became speedy again!
Saturday, 3 September 2011
Monday, 29 August 2011
HP Microserver: Remote Access Card
Remote access functionality, sometimes called "Lights Out" management, is a standard feature on mid- and high-end servers. It allows a system administrator to remotely access the console of the server as well as performing power on, off and reset operations. Most implementations also allow for remote media management, allowing the administrator to remotely connect CD-ROM or floppy images across the network to the server.
Low end servers, including the original ML110 and ML115 G5 servers, and the newer Microserver do not come with this functionality. However, it can be added as an extra.
I was out of spare slots on my KVM, so when I bought the Microserver, I included the Remote Access Card (RAC) in the purchase. The Microserver has a PCIe 16x and PCIe 1x slot. The RAC fits into the 1x slot, leaving another card free for upgrades.
The easiest way to configure the card is to initially use a keyboard and monitor.
The back of the card has a standard RJ45 Ethernet connector and a VGA port. The monitor needs to be connected to this port and not the onboard VGA port. Once connected, the machine can be powered on.
When prompted, press F10 to enter the ROM setup. From here, select the Advanced page and IPMI Configuration:
Select Set LAN Configuration:
Set the BMC LAN Configuration option to Static and then enter and IP address, subnet mask and default gateway:
While in here, it's also worth tuning the VGA configuration. Since this server isn't running anything graphical, I dropped the VGA RAM allocated down to the minumum. From the Advanced page, select PCI Express Configuration:
Under VGA Memory Size, select 32MB.
Exit the ROM setup and save settings. Reboot the server. If everything has been configured successfully, you can now disconnect the monitor and keyboard.
Once configured, open a browser to the IP port and you should get the login screen:
The default username is admin and the default password is password.
I've had problems sometimes getting past the login. My username/password is accepted, but I'm returned to the login page. To avoid, I always go to the index.html and not the login.html, and I use Firefox's Private Browsing mode. I assume a cookie is getting set incorrectly sometimes and this process seems to work around it.
Once logged in, the RAC presents a menu down the left hand side, with the main content on the right. Most is pretty self-explanatory.
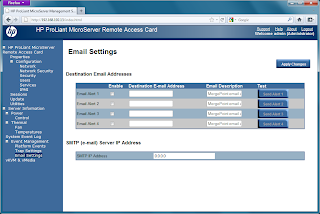
The most interesting are at the bottom and provide access to the virtual media and virtual KVM (Keyboard, Video, Mouse):
The Virtual Media is a Java application (loads through Java Webstart) and allows either the local CD/DVD drive, or an ISO image to be connected remotely to the server:
The Virtual KVM is also a Jave Webstart application and provides access to the server console. Special keystrokes such as CTRL-ALT-DEL can be sent using the Macro menu. The following screenshot shows ESXi 5.0 running on the Microserver:
The only problem I had with the Java applications is when I attempted to access them with my Mac. For some reason it had problems opening the file. So I used Windows instead.
So how good is the RAC? While it's probably true to say that I won't be using it all that often, it's a very useful addition to the Microserver, especially if you want to put it somewhere out of the way like the garage or loft.
Unlike the more expensive ILO cards, the RAC does not have an onboard battery, so if the Microserver loses power completely, it's not possible to connect to it. However, if power is connected to the Microserver, you should be able to connect.
** Update 12-FEB-2013: My thanks to Tom Hall who commented that there is a 1.3 firmware for the RAC that fixes a problem where it becomes unresponsive to the network. I've seen this problem a couple of times and it's a pain as it basically makes the RAC useless. The new firmware should resolve this issue. **
Low end servers, including the original ML110 and ML115 G5 servers, and the newer Microserver do not come with this functionality. However, it can be added as an extra.
I was out of spare slots on my KVM, so when I bought the Microserver, I included the Remote Access Card (RAC) in the purchase. The Microserver has a PCIe 16x and PCIe 1x slot. The RAC fits into the 1x slot, leaving another card free for upgrades.
The easiest way to configure the card is to initially use a keyboard and monitor.
The back of the card has a standard RJ45 Ethernet connector and a VGA port. The monitor needs to be connected to this port and not the onboard VGA port. Once connected, the machine can be powered on.
When prompted, press F10 to enter the ROM setup. From here, select the Advanced page and IPMI Configuration:
Select Set LAN Configuration:
Set the BMC LAN Configuration option to Static and then enter and IP address, subnet mask and default gateway:
While in here, it's also worth tuning the VGA configuration. Since this server isn't running anything graphical, I dropped the VGA RAM allocated down to the minumum. From the Advanced page, select PCI Express Configuration:
Under VGA Memory Size, select 32MB.
Exit the ROM setup and save settings. Reboot the server. If everything has been configured successfully, you can now disconnect the monitor and keyboard.
Once configured, open a browser to the IP port and you should get the login screen:
The default username is admin and the default password is password.
I've had problems sometimes getting past the login. My username/password is accepted, but I'm returned to the login page. To avoid, I always go to the index.html and not the login.html, and I use Firefox's Private Browsing mode. I assume a cookie is getting set incorrectly sometimes and this process seems to work around it.
Once logged in, the RAC presents a menu down the left hand side, with the main content on the right. Most is pretty self-explanatory.
| Email settings |
![]() |
| Remote power control |
| SNMP trap configuration |
The most interesting are at the bottom and provide access to the virtual media and virtual KVM (Keyboard, Video, Mouse):
| Virtual KVM and Media configuration |
The Virtual Media is a Java application (loads through Java Webstart) and allows either the local CD/DVD drive, or an ISO image to be connected remotely to the server:
The Virtual KVM is also a Jave Webstart application and provides access to the server console. Special keystrokes such as CTRL-ALT-DEL can be sent using the Macro menu. The following screenshot shows ESXi 5.0 running on the Microserver:
The only problem I had with the Java applications is when I attempted to access them with my Mac. For some reason it had problems opening the file. So I used Windows instead.
So how good is the RAC? While it's probably true to say that I won't be using it all that often, it's a very useful addition to the Microserver, especially if you want to put it somewhere out of the way like the garage or loft.
Unlike the more expensive ILO cards, the RAC does not have an onboard battery, so if the Microserver loses power completely, it's not possible to connect to it. However, if power is connected to the Microserver, you should be able to connect.
** Update 12-FEB-2013: My thanks to Tom Hall who commented that there is a 1.3 firmware for the RAC that fixes a problem where it becomes unresponsive to the network. I've seen this problem a couple of times and it's a pain as it basically makes the RAC useless. The new firmware should resolve this issue. **
Saturday, 27 August 2011
HP Microserver: BIOS upgrade
Despite my attempts to resist, the HP Microserver (with £100 cashback) was too tempting a deal, and I've recently taken ownership of a small server, Remote Access Card (RAC) for ILO functionality and 2 x 4GB memory sticks.
The Microserver comes with 4 internal SATA drive bays. Disks are mounted in the brackets and then slide into the server vertically. There is another drive bay on top for an optional optical (DVD) drive. A USB port on the motherboard can be used for installing a hypervisor like VMware ESXi.
My plan was to put 4 SATA disks into the internal bays and mount the SSD in the "ODD" (Optical Disk Drive) bay which would be used as a cache. The SSD is an OCZ Vertex 2 and is a 2.5" sized drive (as most SSDs are). To fit into a 3.5" bay, an adapter is provided. Another adapter was then required to fit the 3.5" bracket into the 5.25" bay.
The Microserver has six SATA ports. The four internal drives are connected to the Microserver's mainboard via a "MiniSAS" connector. The remaining two ports are configured as the internal optical port and an external eSATA port.
Unfortunately, the ODD SATA port and the external eSATA port are configured in "IDE Emulation" mode instead of the faster AHCI mode. This means that it will be limited to a maximum bus speed of 132MB/sec, significantly less than the 3Gbps that SATA can theoretically handle, and you lose some advanced features such as Native Command Queuing (NCQ). It's obviously not ideal to take your fastest disk and put it on the slowest port!
As I'm running VMware ESXi Hypervisor, this can be seen in the vSphere client. The four SATA disks appear on the SATA controller but the CD drive appears under the separate IDE controller as can be seen here:
A fix appears to exist, courtesy of a Russian hacker, who has patched the Microserver BIOS to enable an option that allows the user to turn off IDE Emulation mode and change the port mode to standard SATA.
I was initially reluctant to install this hack in case it caused problems (and set my BIOS language to Russian; it doesn't!), but there are plenty of people who have used the hack without problems. To install, do the following:
Important: This worked for me. Apply at your own risk. I'm not responsible if this bricks your server! You probably won't be covered under warranty if you have problems.
Download the latest HP Systems ROMPaq Firmware Upgrade. (it doesn't matter what release you download as the modified BIOS will replace the version with its own).
To get started, open the start.htm file in the download and follow the instructions on writing the upgrade to a USB key.
Download the modified BIOS. You can get a copy of it here.
Once the USB keyhas been written, replace the *.ROM file with the modified BIOS, renaming it so that the original filename remains. The provided ROM on my system was called O41040211.ROM and the modified ROM was called O41_AHCI.ROM. I removed the O41040211.ROM and renamed O41_AHCI.ROM to O41040211.ROM.
Insert the USB drive in the Microserver and boot it. The firmware should apply. Once this returns the C:\ prompt, remove the USB drive and reboot.
Enter the BIOS when prompted to press F10.
Select the Chipset menu item and then SouthBridge Configuration (this is new functionality provided by the hack):
Select SB Sata Configuration:
Set SATA IDE Combined Mode to Disabled:
Exit and save the BIOS changes. When ESXi boots, the Storage Adapters should now look like this:
All SATA ports are now running at the optimal AHCI mode allowing for up to six disks to be connected at full speed and with no legacy overhead.
The Microserver comes with 4 internal SATA drive bays. Disks are mounted in the brackets and then slide into the server vertically. There is another drive bay on top for an optional optical (DVD) drive. A USB port on the motherboard can be used for installing a hypervisor like VMware ESXi.
My plan was to put 4 SATA disks into the internal bays and mount the SSD in the "ODD" (Optical Disk Drive) bay which would be used as a cache. The SSD is an OCZ Vertex 2 and is a 2.5" sized drive (as most SSDs are). To fit into a 3.5" bay, an adapter is provided. Another adapter was then required to fit the 3.5" bracket into the 5.25" bay.
The Microserver has six SATA ports. The four internal drives are connected to the Microserver's mainboard via a "MiniSAS" connector. The remaining two ports are configured as the internal optical port and an external eSATA port.
Unfortunately, the ODD SATA port and the external eSATA port are configured in "IDE Emulation" mode instead of the faster AHCI mode. This means that it will be limited to a maximum bus speed of 132MB/sec, significantly less than the 3Gbps that SATA can theoretically handle, and you lose some advanced features such as Native Command Queuing (NCQ). It's obviously not ideal to take your fastest disk and put it on the slowest port!
As I'm running VMware ESXi Hypervisor, this can be seen in the vSphere client. The four SATA disks appear on the SATA controller but the CD drive appears under the separate IDE controller as can be seen here:
Image courtesy of the excellent Techhead Microserver review and used with permission.
A fix appears to exist, courtesy of a Russian hacker, who has patched the Microserver BIOS to enable an option that allows the user to turn off IDE Emulation mode and change the port mode to standard SATA.
I was initially reluctant to install this hack in case it caused problems (and set my BIOS language to Russian; it doesn't!), but there are plenty of people who have used the hack without problems. To install, do the following:
Important: This worked for me. Apply at your own risk. I'm not responsible if this bricks your server! You probably won't be covered under warranty if you have problems.
Download the latest HP Systems ROMPaq Firmware Upgrade. (it doesn't matter what release you download as the modified BIOS will replace the version with its own).
To get started, open the start.htm file in the download and follow the instructions on writing the upgrade to a USB key.
Download the modified BIOS. You can get a copy of it here.
Once the USB keyhas been written, replace the *.ROM file with the modified BIOS, renaming it so that the original filename remains. The provided ROM on my system was called O41040211.ROM and the modified ROM was called O41_AHCI.ROM. I removed the O41040211.ROM and renamed O41_AHCI.ROM to O41040211.ROM.
Insert the USB drive in the Microserver and boot it. The firmware should apply. Once this returns the C:\ prompt, remove the USB drive and reboot.
Enter the BIOS when prompted to press F10.
Select the Chipset menu item and then SouthBridge Configuration (this is new functionality provided by the hack):
Select SB Sata Configuration:
Set SATA IDE Combined Mode to Disabled:
Exit and save the BIOS changes. When ESXi boots, the Storage Adapters should now look like this:
All SATA ports are now running at the optimal AHCI mode allowing for up to six disks to be connected at full speed and with no legacy overhead.
Friday, 26 August 2011
Mac OS X Lion and CUPS printing
When I originally setup my Mac Mini a few years ago (with Leopard), I had some issues getting the printer setup on my network using CUPS. Having upgraded to Lion a couple of weeks ago, the printing problems returned.
The first problem I had was that my printer, an HP Deskjet 5150, was not on the supported list of Apple printer drivers. HP were similarly useless in not providing a driver.
The answer was found in the open source community. A quick download and install of Ghostscript, Foomatic-RIP and HPIJS make the correct driver available (along with many other printer drivers).
This allowed me to add my printer, but upon trying to print, the print queue window would report that it was "Unable to get printer status". Not helpful.
The remote printer is connected to my Netgear ReadyNAS Duo which runs an embedded Linux distribution and uses CUPS as the print server. Despite trying to dig into the debug options, I was not able to fix the printing error.
The default method of setting up a printer on a Mac is to use Bonjour for auto discovery. This uses the Internet Printing Protocol (IPP) under the hood but was failing. Attempts to setup the IPP queue manually also failed.
The fix that worked for me was to set up the printer as an SMB (Windows) printer. This uses the ReadyNAS's Samba install and printing now works! Not ideal, but does the job.
The first problem I had was that my printer, an HP Deskjet 5150, was not on the supported list of Apple printer drivers. HP were similarly useless in not providing a driver.
The answer was found in the open source community. A quick download and install of Ghostscript, Foomatic-RIP and HPIJS make the correct driver available (along with many other printer drivers).
This allowed me to add my printer, but upon trying to print, the print queue window would report that it was "Unable to get printer status". Not helpful.
The remote printer is connected to my Netgear ReadyNAS Duo which runs an embedded Linux distribution and uses CUPS as the print server. Despite trying to dig into the debug options, I was not able to fix the printing error.
The default method of setting up a printer on a Mac is to use Bonjour for auto discovery. This uses the Internet Printing Protocol (IPP) under the hood but was failing. Attempts to setup the IPP queue manually also failed.
The fix that worked for me was to set up the printer as an SMB (Windows) printer. This uses the ReadyNAS's Samba install and printing now works! Not ideal, but does the job.
Wednesday, 13 July 2011
VMware announce vSphere 5 and why all we're talking about is licensing
Yesterday, VMware announced the latest version of their flagship product: vSphere 5. This new version further extends VMware's lead over its competitors in the virtualisation space giving users the ability to run more and bigger VMs. Compare the capabilities of vSphere vs XenServer or Hyper-V and the ongoing technical superiority of vSphere is apparent.
The new version offers new features such as the ability to automatically provision ESXi servers, storage enhancements (improvements to VMFS, Storage DRS and Profile-Driven Storage), a rewritten HA component, a Virtual Storage Appliance (which looks interesting for SMBs) and a new ESXi firewall. All of which are useful additions to the product.
Regular Enterprise customers have less to get excited about since the Auto Deploy, Storage DRS and Profile-Driven Storage features join the Distributed vSwitch, Storage- and Network-I/O control and Host Profiles as Plus-only features.
You would imagine that the conversations on Twitter and in blogs would be about these amazing new features. You would be wrong.
In releasing vSphere 5, VMware have made a significant licensing change. Whereas previous versions were licensed per CPU, with a limit on the number of cores per CPU, the new version is licensed per CPU with no restriction on cores. However, the amount of memory that vSphere can use is now licensed which VMware are calling the "vRAM Entitlement". The vRAM entitlement is the amount of RAM used by VMs.
A single CPU licence for vSphere 5 Enterprise comes with a vRAM entitlement of 32GB RAM. In a dual CPU ESXi host, this means the sum of RAM allocated to VMs is 64GB. In real terms, this would be equivalent to 32x2GB RAM VMs or 16x4GB RAM VMs.
The vRAM calculation is based on a pool of all resources, so in a cluster with 8 hosts, each with 2 CPUs and 32GB RAM, the total vRAM licensed is 512GB (8 x 2 x 32).
While the VMware Licensing, Pricing and Packaging PDF tries to make it sound like good news for end users because we will no longer be limited to a number of CPU cores, I wonder how many users are CPU-bound. Looking at the infrastructures that I support, CPU utilisation is never the bottleneck; available RAM is.
The way around this limitation is to purchase additional CPU licences. So, if you have a server with 2 CPUs and 128GB RAM running Enterprise, the 2 CPU licences you have will only support 64GB vRAM, so you'll need to purchase another 2 CPU licences. Ker-ching for VMware!
I have some sympathy for users who have deployed large scale servers such as Cisco UCS blades. With a comparatively "normal" CPU count, but huge memory capacity, the licensing requirement for these environments has just gone through the roof.
One of the advantages of VMware vs its competitors is the number of VMs that can be supported on a single host. With Transparent Page Sharing (TPS) and memory compression, vSphere can typically run more VMs than XenServer or Hyper-V and overcommit allows a 32GB server to run more than 32GBs worth of VMs. Now, the savings made in terms of required hardware is offset by the need to purchase more licences.
For those of us with home labs that we use for testing, the vRAM entitlement may be a significant bottleneck. The HP ML110 G6 is a cheap, single-socket server capable of holding 16GB RAM. The free VMware vSphere Hypervisor (AKA ESXi) will only support 8GB per CPU. Whether a second free licence can be applied is unknown, but if not, many home labs will be limited to 8GB vRAM per host. This means more servers will be required which can cause significant spouse issues.
The VMware perspective is understandable. The ability for servers to run with huge amounts of RAM means that organisations require fewer servers, which means less money to VMware.
So is there any good news in this? The one thing that I can think of is it now makes charge back of VM resources easier to calculate. It appears that instead of managing "traditional" virtual infrastructures, where IT is a cost centre, VMware are shifting to a world where everything is provisioned through a cloud infrastructure and IT is a service. In this new world, the ability to charge back will be a core component.
In summary, some users will be unaffected by this change, some will need to pay a bit more to make full use of their environment, and others will need to pay a lot more. I'm sure that VMware's competitors will have a field day with this.
(All the above is based on the VMware pricing document (linked above). If anyone spots anything incorrect, please comment and I'll fix it. Thanks!).
The new version offers new features such as the ability to automatically provision ESXi servers, storage enhancements (improvements to VMFS, Storage DRS and Profile-Driven Storage), a rewritten HA component, a Virtual Storage Appliance (which looks interesting for SMBs) and a new ESXi firewall. All of which are useful additions to the product.
Regular Enterprise customers have less to get excited about since the Auto Deploy, Storage DRS and Profile-Driven Storage features join the Distributed vSwitch, Storage- and Network-I/O control and Host Profiles as Plus-only features.
You would imagine that the conversations on Twitter and in blogs would be about these amazing new features. You would be wrong.
In releasing vSphere 5, VMware have made a significant licensing change. Whereas previous versions were licensed per CPU, with a limit on the number of cores per CPU, the new version is licensed per CPU with no restriction on cores. However, the amount of memory that vSphere can use is now licensed which VMware are calling the "vRAM Entitlement". The vRAM entitlement is the amount of RAM used by VMs.
A single CPU licence for vSphere 5 Enterprise comes with a vRAM entitlement of 32GB RAM. In a dual CPU ESXi host, this means the sum of RAM allocated to VMs is 64GB. In real terms, this would be equivalent to 32x2GB RAM VMs or 16x4GB RAM VMs.
The vRAM calculation is based on a pool of all resources, so in a cluster with 8 hosts, each with 2 CPUs and 32GB RAM, the total vRAM licensed is 512GB (8 x 2 x 32).
While the VMware Licensing, Pricing and Packaging PDF tries to make it sound like good news for end users because we will no longer be limited to a number of CPU cores, I wonder how many users are CPU-bound. Looking at the infrastructures that I support, CPU utilisation is never the bottleneck; available RAM is.
The way around this limitation is to purchase additional CPU licences. So, if you have a server with 2 CPUs and 128GB RAM running Enterprise, the 2 CPU licences you have will only support 64GB vRAM, so you'll need to purchase another 2 CPU licences. Ker-ching for VMware!
I have some sympathy for users who have deployed large scale servers such as Cisco UCS blades. With a comparatively "normal" CPU count, but huge memory capacity, the licensing requirement for these environments has just gone through the roof.
One of the advantages of VMware vs its competitors is the number of VMs that can be supported on a single host. With Transparent Page Sharing (TPS) and memory compression, vSphere can typically run more VMs than XenServer or Hyper-V and overcommit allows a 32GB server to run more than 32GBs worth of VMs. Now, the savings made in terms of required hardware is offset by the need to purchase more licences.
For those of us with home labs that we use for testing, the vRAM entitlement may be a significant bottleneck. The HP ML110 G6 is a cheap, single-socket server capable of holding 16GB RAM. The free VMware vSphere Hypervisor (AKA ESXi) will only support 8GB per CPU. Whether a second free licence can be applied is unknown, but if not, many home labs will be limited to 8GB vRAM per host. This means more servers will be required which can cause significant spouse issues.
The VMware perspective is understandable. The ability for servers to run with huge amounts of RAM means that organisations require fewer servers, which means less money to VMware.
So is there any good news in this? The one thing that I can think of is it now makes charge back of VM resources easier to calculate. It appears that instead of managing "traditional" virtual infrastructures, where IT is a cost centre, VMware are shifting to a world where everything is provisioned through a cloud infrastructure and IT is a service. In this new world, the ability to charge back will be a core component.
In summary, some users will be unaffected by this change, some will need to pay a bit more to make full use of their environment, and others will need to pay a lot more. I'm sure that VMware's competitors will have a field day with this.
(All the above is based on the VMware pricing document (linked above). If anyone spots anything incorrect, please comment and I'll fix it. Thanks!).
Sunday, 10 July 2011
How Windows Live Mesh broke my ReadyNAS backup
The following has taken me a while to figure out, but here is the answer and it's hopefully useful to someone else with the same (or similar) problem.
I have a Netgear ReadyNAS appliance which I bought because it there was a very good deal on at the time (buy a unit with a 1TB disk and get another 1TB disk for free). It's sat on my desk and not been doing much as I've had other projects to work on.
I decided to configure it as a backup NAS for some of my other machines, specifically T's HP Pavilion and my Aspire Revo, both running Windows 7. I was interested in backing up documents only, so configured the ReadyNAS to connect to each Windows PC fileshare and pull in the data.
This worked perfectly on T's PC but on mine, the ReadyNAS kept complaining that it could not connect to \\REVO\Users. I checked that T's PC could see the Revo share. It could. It tried it with my Mac and could browse the Revo using Finder. I upgraded the firmware in the ReadyNAS. That made no difference.
I then resorted to running smbtree on the command line to see what was happening. This gave me the following output:
\\REVO
cli_rpc_pipe_open: cli_nt_create failed on pipe \srvsvc to machine REVO. Error was NT_STATUS_ACCESS_DENIED
Okay, this was a clue. I remembered the previous problems I had with Samba (which is also running on the ReadyNAS) and Windows 7. Microsoft had set the default authentication protocol to NTLMv2 which was not supported by older versions of Samba. The workaround was to set the Network Security policy on the Windows 7 box to accept NTLM (v1) instead. I check this on the Revo, but it was setup correctly.
I then tried to run smbclient -L //REVO to list the shares on the Revo. The equivalent command worked fine on T's PC, but I got the following on the Revo:
mac-mini:~$ smbclient -L //REVO
Password:
session setup failed: SUCCESS - 0
Time to turn on debugging (appending -d10 to the above command) and compare the output against the two machines. This showed that there was a difference in the authentication protocols being negotiated.
It was at this point, I remembered a forum post that when I read it seemed irrelevant. The post stated that if Microsoft Live Sign-On Assistant was running, this could cause problems as it introduces another authentication protocol "mechToken". Really? An application can break file sharing?
I run Windows Live Mesh on the Revo, which uses the Windows Live Sign-On Assistant. I uninstalled this. The connection worked! I then tested the ReadyNAS connection and... it worked!
I'm not sure where the "fault" lies here but life would be much easier if these protocols were all properly documented and were designed to gracefully fail if the software sees something unfamiliar.
I have a Netgear ReadyNAS appliance which I bought because it there was a very good deal on at the time (buy a unit with a 1TB disk and get another 1TB disk for free). It's sat on my desk and not been doing much as I've had other projects to work on.
I decided to configure it as a backup NAS for some of my other machines, specifically T's HP Pavilion and my Aspire Revo, both running Windows 7. I was interested in backing up documents only, so configured the ReadyNAS to connect to each Windows PC fileshare and pull in the data.
This worked perfectly on T's PC but on mine, the ReadyNAS kept complaining that it could not connect to \\REVO\Users. I checked that T's PC could see the Revo share. It could. It tried it with my Mac and could browse the Revo using Finder. I upgraded the firmware in the ReadyNAS. That made no difference.
I then resorted to running smbtree on the command line to see what was happening. This gave me the following output:
\\REVO
cli_rpc_pipe_open: cli_nt_create failed on pipe \srvsvc to machine REVO. Error was NT_STATUS_ACCESS_DENIED
Okay, this was a clue. I remembered the previous problems I had with Samba (which is also running on the ReadyNAS) and Windows 7. Microsoft had set the default authentication protocol to NTLMv2 which was not supported by older versions of Samba. The workaround was to set the Network Security policy on the Windows 7 box to accept NTLM (v1) instead. I check this on the Revo, but it was setup correctly.
I then tried to run smbclient -L //REVO to list the shares on the Revo. The equivalent command worked fine on T's PC, but I got the following on the Revo:
mac-mini:~$ smbclient -L //REVO
Password:
session setup failed: SUCCESS - 0
Time to turn on debugging (appending -d10 to the above command) and compare the output against the two machines. This showed that there was a difference in the authentication protocols being negotiated.
It was at this point, I remembered a forum post that when I read it seemed irrelevant. The post stated that if Microsoft Live Sign-On Assistant was running, this could cause problems as it introduces another authentication protocol "mechToken". Really? An application can break file sharing?
I run Windows Live Mesh on the Revo, which uses the Windows Live Sign-On Assistant. I uninstalled this. The connection worked! I then tested the ReadyNAS connection and... it worked!
I'm not sure where the "fault" lies here but life would be much easier if these protocols were all properly documented and were designed to gracefully fail if the software sees something unfamiliar.
Thursday, 9 June 2011
CrashPlan on Mac OS X
I've been testing CrashPlan as a method of backing up my files to the cloud. After taking a couple of weeks to get all the data up, it's working pretty well and I'm planning on paying for it on a monthly basis. The one downside is that having CrashPlan loaded appears to slow my old Core 2 Duo Mac Mini down. This seems to be because the Java app consumes several hundred megabytes over time.
CrashPlan comprises of two parts: The front end GUI and a Java-based engine. The first job I did was to customise the backup window so that it only backs up overnight. As my Mac is on all the time, this is not a problem. The reason for this is that I'm asleep and not using the computer, and my ISP, Plusnet, have a monthly bandwidth allowance, but 12am-8am traffic is not counted.
In order to work around the memory leak issue, I've created two root cron jobs to start up the engine just before it's needed, and shut it down again afterwards. To do this requires the UNIX command prompt (open the Terminal app):
First, open a root prompt by running a BASH shell:
(enter your password here)
Then edit the crontab by running:
Enter the following lines:
# Start CrashPlan engine at 5 minutes to midnight in time for overnight run
55 23 * * * /bin/launchctl load /Library/LaunchDaemons/com.crashplan.engine.plist
# Stop CrashPlan engine at 5 minutes past 8am to free memory after overnight run
05 08 * * * /bin/launchctl unload /Library/LaunchDaemons/com.crashplan.engine.plist
Edit the vi editor (hit escape, then type :wq! and hit return).
You can view your crontab by running:
This gives the benefit of overnight CrashPlan backups, but without having any unnecessary services running in the background during the day.
CrashPlan comprises of two parts: The front end GUI and a Java-based engine. The first job I did was to customise the backup window so that it only backs up overnight. As my Mac is on all the time, this is not a problem. The reason for this is that I'm asleep and not using the computer, and my ISP, Plusnet, have a monthly bandwidth allowance, but 12am-8am traffic is not counted.
In order to work around the memory leak issue, I've created two root cron jobs to start up the engine just before it's needed, and shut it down again afterwards. To do this requires the UNIX command prompt (open the Terminal app):
First, open a root prompt by running a BASH shell:
$ sudo bash
(enter your password here)
Then edit the crontab by running:
# crontab -e
Enter the following lines:
# Start CrashPlan engine at 5 minutes to midnight in time for overnight run
55 23 * * * /bin/launchctl load /Library/LaunchDaemons/com.crashplan.engine.plist
# Stop CrashPlan engine at 5 minutes past 8am to free memory after overnight run
05 08 * * * /bin/launchctl unload /Library/LaunchDaemons/com.crashplan.engine.plist
Edit the vi editor (hit escape, then type :wq! and hit return).
You can view your crontab by running:
# crontab -l
This gives the benefit of overnight CrashPlan backups, but without having any unnecessary services running in the background during the day.
Subscribe to:
Posts (Atom)