Saturday, 22 October 2011

HP Microserver SAN in a box: Benchmarks

In my previous post, I detailed the build of my new "SAN" using an HP Microserver and the Nexentastor virtual storage appliance. Interested in knowing what the server was capable of, I installed the bonnie++ benchmarking software on the Nexenta VM and ran a number of tests to see how well it would perform as a datastore host for the VMware lab:

Each test was run four times and the average of each result taken. All testing was performed against a four disk RAIDZ parity stripe with an SSD read cache.

For the first test, the ZFS filesystem was configured sync=standard and compression=off. This resulted in the following averages:

  • Block Writes: 65MB/sec
  • Rewrites: 39MB/sec
  • Block Reads: 173MB/sec
  • Random Seeks: 451.55

For the second test, sync=standard and compression=on:

  • Block Writes: 148MB/sec
  • Rewrites: 107MB/sec
  • Block Reads: 218MB/sec
  • Random Seeks: 2036.1

As the results show, enabling compression results in a huge performance boost.

Although not recommended in situations where data integrity is important, ZFS supports the option of disabling synchronous writes. The third test was run with sync=disabled and compression=on:

  • Block Writes: 164MB/sec
  • Rewrites: 113MB/sec
  • Block Reads: 216MB/sec
  • Random Seeks: 2522.76

As expected, disabling synchronous writes improved the write performance of the server and had a corresponding knock-on effect for the rewrites. Block reads, although marginally slower than the second test, were close enough to suggest the difference was environmental.

Although running with synchronous writes disabled resulted in the highest performance, in order to get the best possible data integrity, I opted to run with sync=standard and compression=on.

While running the benchmark with compression=on, I noted in the vSphere client that both the CPU cores in the Microserver ran at nearly 100% (the Nexenta VM has 2 x vCPUs assigned). This suggests that the performance here was limited, not by the disks, but by the rather weak CPU in the Microserver.

Sunday, 18 September 2011

HP Microserver: Building a SAN in a box

[Update 05/2013: I've since migrated my Nexenta install to a dedicated server. See here for the details.]

Following a recent upgrade to my home lab, my storage now looks like this:
  • A unified SAN capable of providing both block (iSCSI) and file (NFS/CIFS) data.
  • Eight disks:
    • 2 x SSD
    • 6 x SATA
  • Two discrete RAID groups: 
    • a 400GB (usable capacity) two disk mirror
    • a 1.2TB (usable capacity) four disk parity stripe
  • Both RAID groups have dedicated 20GB flash read caches.
  • LUNs can be configured to support compression and/or deduplication
  • Copy on Write (COW) snapshots for all filesystems and LUNs
  • Support for replicating filesystems and LUNs to a second SAN

All sounds pretty funky. Must be expensive right?

Actually, the above is all achieved using a very cheap HP Microserver running VMware ESXi and the Nexenta virtual storage appliance. I've assigned the Nexenta VM 4GB RAM, but it would happily use more for it's L1 read cache.

The HP Microserver has 4 x SATA disks (2 x 1TB and 2 x 500GB) with a single 60GB SSD disk.

The Nexenta virtual machine is then assigned VMDK files. The first RAID group is a mirror: one VMDK file on SATA disks 1 and 2. The second RAID group is a RAIDZ parity stripe: one VMDK file on SATA disks 1, 2, 3 and 4. The flash read caches are 20GB VMDK files on the SSD.

The compression, deduplication, snapshot and replication features are provided by the ZFS filesystem.

This is a pictorial representation of the configuration:


And this is what it looks like physically:


Oops. No, that's the NetApp at work. But functionality-wise they are quite similar (obviously the vastly more expensive NetApp is much faster!).

This is the real physical hardware (on the far right, next to the ML110 and ML115):


Pretty small for such a setup. I've currently only got the built-in NIC in the Microserver, but will look at adding another to create a dedicated storage network.

Saturday, 17 September 2011

Cisco SG200-26 review

Until recently I was using a Netgear GS108 switch for my home lab. This eight port, unmanaged switch performed well, but with the addition of a couple of HP Microservers, I ran out of free ports and needed something bigger.

Although not essential to the lab, I wanted a switch with a few more features. I initially looked at the Cisco SG200-18, the HP V1810-24G and a couple of other makes that I hadn't come across before (TP-Link and ZyXEL). The one requirement was that the new switch should be silent. The fans of a Cisco Catalyst switch would dominate the home office and was unacceptable.

I discounted the switches from TP-Link and ZyXEL because I couldn't find any decent reviews of them online. The HP V1810 was then discounted because the price hiked up to over £230. This left the Cisco SG200-18. I then noticed that the SG200-26 was only £3 more expensive at £188 (from Ebuyer), so buying the smaller switch would not have made financial sense. You can't have too many ports, right?


The first thing to say about the Cisco SG200-26 is that it is not an IOS switch. I assume it's the result of the purchase of Linksys. Having said that, the build quality is good, the switch is absolutely silent in operation but doesn't get hot (in contrast, the Netgear was hot to touch). The SG200-26 is a managed, layer 2 switch.

The SG200-26 has 24 standard 10/100/1000 ports, plus another two ports for uplinks. These can be RJ-45 10/100/1000 ports or SFP fibre ports (SFP modules not included). The form factor is standard rack-mount 1U (rack mount kit included) but also has attachable rubber feet for desktop use.


Configuration is through the web interface only (no SSH or serial interface), but does support external logging to a syslog server.

Be sure to upgrade to the latest firmware. This enabled the Cisco Discovery Protocol (CDP) which is very useful in vSphere networking for identifying which physical ports a NIC is plugged into.

In the web interface, ports can be given a description and those of us with OCD can spend a happy evening mapping this information into the switch. The port settings can also be used to state the speed and duplex setting of each port.

The SG200-26 supports up to four Link Aggregation Groups (LAGs) and can load balance based on either MAC address or IP/MAC address. Both static and dynamic (LACP) LAG groups can be configured. Up to eight ports can be assigned to a static LAG and sixteen ports to a dynamic LAG.

Multiple VLANs can be setup and managed as the switch supports 802.1q. Ports can be setup as trunk, general, access or Q-in-Q mode. VLAN pruning can be applied to trunk ports so that only specific VLANs are accessible to particular ports. The interface for this wasn't immediately obvious to me (and setting up the same in IOS initially seemed easier), but once I'd spent some time with it, the VLAN configuration was fairly straightforward. These VLAN options can be applied to either individual ports or a LAG.

In addition to these features, the SG200-26 can also be configured for QoS, there are numerous security features including 802.1X, Smartport macros to configure the port type (e.g, Printer, Desktop, Guest, Server etc.). Jumbo frames can be enabled, although this applies is a global setting that affects all ports (most switches, even expensive Cisco switches, work the same way). A "Green Ethernet" function reduces the power requirements of the switch by calculating the length of cable, and also by turning off unused ports to save energy.

As a lab switch, the SG200-26 is ideal. Personally, I would have liked to see a command line option for configuration as some tasks can be repetitive (e.g., setting up VLANs). Beyond that though, there is little to complain about. The SG200-26 is an excellent entry-level switch, with plenty of ports and a good range of options.


Some useful links:

The Cisco Small Business 200 Series Smart Switch Administration Guide

The Cisco Small Business Online Device Emulators page has a demo of the web interface for the SF300. The 300 series has additional layer 3 functionality, but you can get a good idea what the interface is like on the 200 series.

* Update 10/07/2012 * I experienced an issue where traffic between two ports (e.g., ports 1 and 2) would cause significant latency issues on other, unrelated ports. This was demonstrated by putting a ping on a host and watching the timings when there was significant network load (such as VM backups). This was resolved by upgrading the firmware to 1.1.2.0.

Friday, 9 September 2011

ISP router ARP cache problems when replacing servers

I experienced a problem today that took a while to understand so figured it was worth sharing...

Our external mail gateway was due for replacement and a new virtual machine was built, configured and tested alongside the old production server. Happy that everything was functioning as expected, the only remaining task was to disconnect the old server from the network and rename the IP address of the new server from its test IP to that of the old server. This would require no changes to DNS and total downtime would be about a minute.

The change was made and... nothing. No traffic to the new server.

Huh? I tested it from another IP on the public network and it was fine. We tried from another network and... nothing.

I changed the IP back to the test address and the server sprang into life.

After a significant amount of time brainstorming with colleagues as to what was happening, we hit upon the possible problem being an ARP cache issue on the ISP provided router. Unfortunately, we don't have administrative access to this router.

Fortunately, the ISP hadn't locked down the console port of the Cisco router and I was able to connect in and run a "show ip arp" command. Sure enough, it showed the MAC address of the old server. This meant that when packets arrived from the Internet the router was trying to forward them to the old server that was no longer on the network. If I had administrative access to the router, I would have been able to flush the ARP cache and all would have been good. But because this was a "managed" router, I wasn't able to do this. I could see the problem, I knew the solution, but couldn't fix it.

I did some research online to see what the default ARP cache timeout was: typically 4 hours.

I logged a call with the ISP which was not a particularly useful experience. The ISP is a subsidiary of Cable & Wireless, and if you've ever had the misfortune of working with that company you'll understand what I'm talking about! I was told I'd get a call back in 8 hours. Brilliant! Not.

There were a couple of other options: Pulling the Ethernet cable from the router would down the interface which I *think* will cause the ARP cache to flush. I didn't have the luxury of doing this in hours.

The final option was to try and get the new server to send a gratuitous ARP request. This is an ARP request that a server broadcasts about itself. The idea is that other devices on the network will update their ARP caches with the information.

My server however was hidden behind a Cisco ASA firewall.

As I was searching for ways to get this working, the ARP cache timed out (possibly due to the router configuration being lower than the default, although I can't see the config to confirm this) and the new server sprang into life.

At first I wasn't sure whether it was the gratuitous ARP that fixed it, but within the next hour, the ISP called and confirmed they cleared the cache. So fair play to them for getting on with it and sorting the problem.


It's been a learning experience in that even the simplest and quickest network change can have unforeseen side effects!

Saturday, 3 September 2011

Slow Windows 2008 install in an ESXi VM

This is just a quick note on a problem I've just experienced (and found a fix for!).

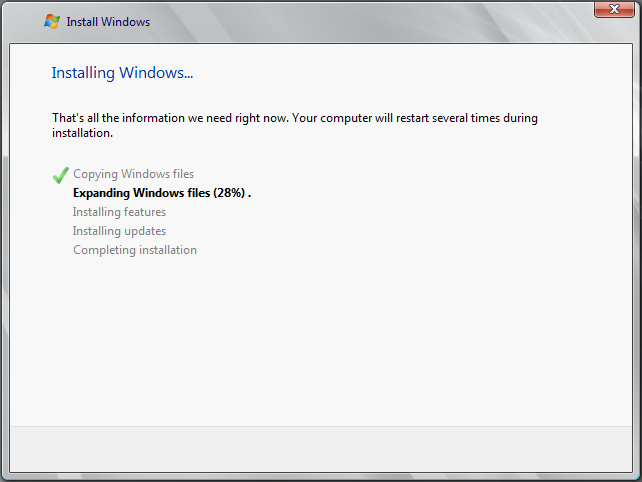
Having just built a new Windows 2008 VM and mounting the ISO from my NFS ISO datastore, I was surprised to see that the actual install was crawling along very slowly at the "Expanding Windows files" section:


As the above link indicates, the problem was the ESX hosts NIC configuration. Set to "auto-negotiate" (which it should be on gigabit connections), the port had managed to negotiate down to 10Mb half-duplex(!). I changed this to 1000Mbit full-duplex and then back to auto-negotiate (where it stayed at 1000Mbit full-duplex).


And the performance became speedy again!

Monday, 29 August 2011

HP Microserver: Remote Access Card

Remote access functionality, sometimes called "Lights Out" management, is a standard feature on mid- and high-end servers. It allows a system administrator to remotely access the console of the server as well as performing power on, off and reset operations. Most implementations also allow for remote media management, allowing the administrator to remotely connect CD-ROM or floppy images across the network to the server.

Low end servers, including the original ML110 and ML115 G5 servers, and the newer Microserver do not come with this functionality. However, it can be added as an extra.

I was out of spare slots on my KVM, so when I bought the Microserver, I included the Remote Access Card (RAC) in the purchase. The Microserver has a PCIe 16x and PCIe 1x slot. The RAC fits into the 1x slot, leaving another card free for upgrades.

The easiest way to configure the card is to initially use a keyboard and monitor.

The back of the card has a standard RJ45 Ethernet connector and a VGA port. The monitor needs to be connected to this port and not the onboard VGA port. Once connected, the machine can be powered on.

When prompted, press F10 to enter the ROM setup. From here, select the Advanced page and IPMI Configuration:


Select Set LAN Configuration:


Set the BMC LAN Configuration option to Static and then enter and IP address, subnet mask and default gateway:


While in here, it's also worth tuning the VGA configuration. Since this server isn't running anything graphical, I dropped the VGA RAM allocated down to the minumum. From the Advanced page, select PCI Express Configuration:


Under VGA Memory Size, select 32MB.

Exit the ROM setup and save settings. Reboot the server. If everything has been configured successfully, you can now disconnect the monitor and keyboard.

Once configured, open a browser to the IP port and you should get the login screen:


The default username is admin and the default password is password.

I've had problems sometimes getting past the login. My username/password is accepted, but I'm returned to the login page. To avoid, I always go to the index.html and not the login.html, and I use Firefox's Private Browsing mode. I assume a cookie is getting set incorrectly sometimes and this process seems to work around it.

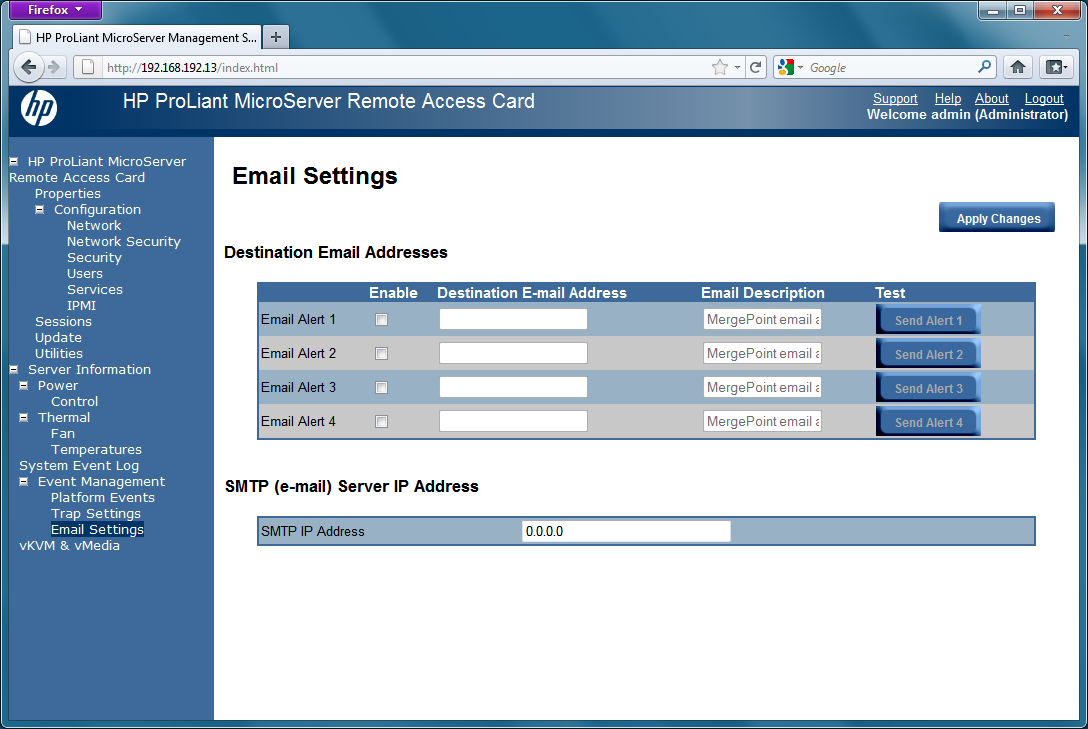
Once logged in, the RAC presents a menu down the left hand side, with the main content on the right. Most is pretty self-explanatory.
Email settings


Remote power control

SNMP trap configuration

 The most interesting are at the bottom and provide access to the virtual media and virtual KVM (Keyboard, Video, Mouse):

Virtual KVM and Media configuration

The Virtual Media is a Java application (loads through Java Webstart) and allows either the local CD/DVD drive, or an ISO image to be connected remotely to the server:


The Virtual KVM is also a Jave Webstart application and provides access to the server console. Special keystrokes such as CTRL-ALT-DEL can be sent using the Macro menu. The following screenshot shows ESXi 5.0 running on the Microserver:


The only problem I had with the Java applications is when I attempted to access them with my Mac. For some reason it had problems opening the file. So I used Windows instead.

So how good is the RAC? While it's probably true to say that I won't be using it all that often, it's a very useful addition to the Microserver, especially if you want to put it somewhere out of the way like the garage or loft.

Unlike the more expensive ILO cards, the RAC does not have an onboard battery, so if the Microserver loses power completely, it's not possible to connect to it. However, if power is connected to the Microserver, you should be able to connect.

** Update 12-FEB-2013: My thanks to Tom Hall who commented that there is a 1.3 firmware for the RAC that fixes a problem where it becomes unresponsive to the network. I've seen this problem a couple of times and it's a pain as it basically makes the RAC useless. The new firmware should resolve this issue. **

Saturday, 27 August 2011

HP Microserver: BIOS upgrade

Despite my attempts to resist, the HP Microserver (with £100 cashback) was too tempting a deal, and I've recently taken ownership of a small server, Remote Access Card (RAC) for ILO functionality and 2 x 4GB memory sticks.

The Microserver comes with 4 internal SATA drive bays. Disks are mounted in the brackets and then slide into the server vertically. There is another drive bay on top for an optional optical (DVD) drive. A USB port on the motherboard can be used for installing a hypervisor like VMware ESXi.

My plan was to put 4 SATA disks into the internal bays and mount the SSD in the "ODD" (Optical Disk Drive) bay which would be used as a cache. The SSD is an OCZ Vertex 2 and is a 2.5" sized drive (as most SSDs are). To fit into a 3.5" bay, an adapter is provided. Another adapter was then required to fit the 3.5" bracket into the 5.25" bay.

The Microserver has six SATA ports. The four internal drives are connected to the Microserver's mainboard via a "MiniSAS" connector. The remaining two ports are configured as the internal optical port and an external eSATA port.

Unfortunately, the ODD SATA port and the external eSATA port are configured in "IDE Emulation" mode instead of the faster AHCI mode. This means that it will be limited to a maximum bus speed of 132MB/sec, significantly less than the 3Gbps that SATA can theoretically handle, and you lose some advanced features such as Native Command Queuing (NCQ). It's obviously not ideal to take your fastest disk and put it on the slowest port!

As I'm running VMware ESXi Hypervisor, this can be seen in the vSphere client. The four SATA disks appear on the SATA controller but the CD drive appears under the separate IDE controller as can be seen here:


Image courtesy of the excellent Techhead Microserver review and used with permission.


A fix appears to exist, courtesy of a Russian hacker, who has patched the Microserver BIOS to enable an option that allows the user to turn off IDE Emulation mode and change the port mode to standard SATA.

I was initially reluctant to install this hack in case it caused problems (and set my BIOS language to Russian; it doesn't!), but there are plenty of people who have used the hack without problems. To install, do the following:

Important: This worked for me. Apply at your own risk. I'm not responsible if this bricks your server! You probably won't be covered under warranty if you have problems.

Download the latest HP Systems ROMPaq Firmware Upgrade. (it doesn't matter what release you download as the modified BIOS will replace the version with its own).

To get started, open the start.htm file in the download and follow the instructions on writing the upgrade to a USB key.

Download the modified BIOS. You can get a copy of it here.

Once the USB keyhas been written, replace the *.ROM file with the modified BIOS, renaming it so that the original filename remains. The provided ROM on my system was called O41040211.ROM and the modified ROM was called O41_AHCI.ROM. I removed the O41040211.ROM and renamed O41_AHCI.ROM to O41040211.ROM.

Insert the USB drive in the Microserver and boot it. The firmware should apply. Once this returns the C:\ prompt, remove the USB drive and reboot.

Enter the BIOS when prompted to press F10.

Select the Chipset menu item and then SouthBridge Configuration (this is new functionality provided by the hack):


 Select SB Sata Configuration:


Set SATA IDE Combined Mode to Disabled:


Exit and save the BIOS changes. When ESXi boots, the Storage Adapters should now look like this:


All SATA ports are now running at the optimal AHCI mode allowing for up to six disks to be connected at full speed and with no legacy overhead.